I have a t-shirt collar pattern that I’d like to include as part of the options in the Teagan and Toni. The SVG is attached. It’s the same pattern for all sizes (it’s a pattern and a ruler). Is there an easy way to include an SVG in a pattern as an option to include/exclude? I’d be glad to draft some detailed instructions on how to use it (beyond the instructions on the pattern/ruler itself). This t-shirt collar is going to make an appearance in my upcoming Threads Magazine article.
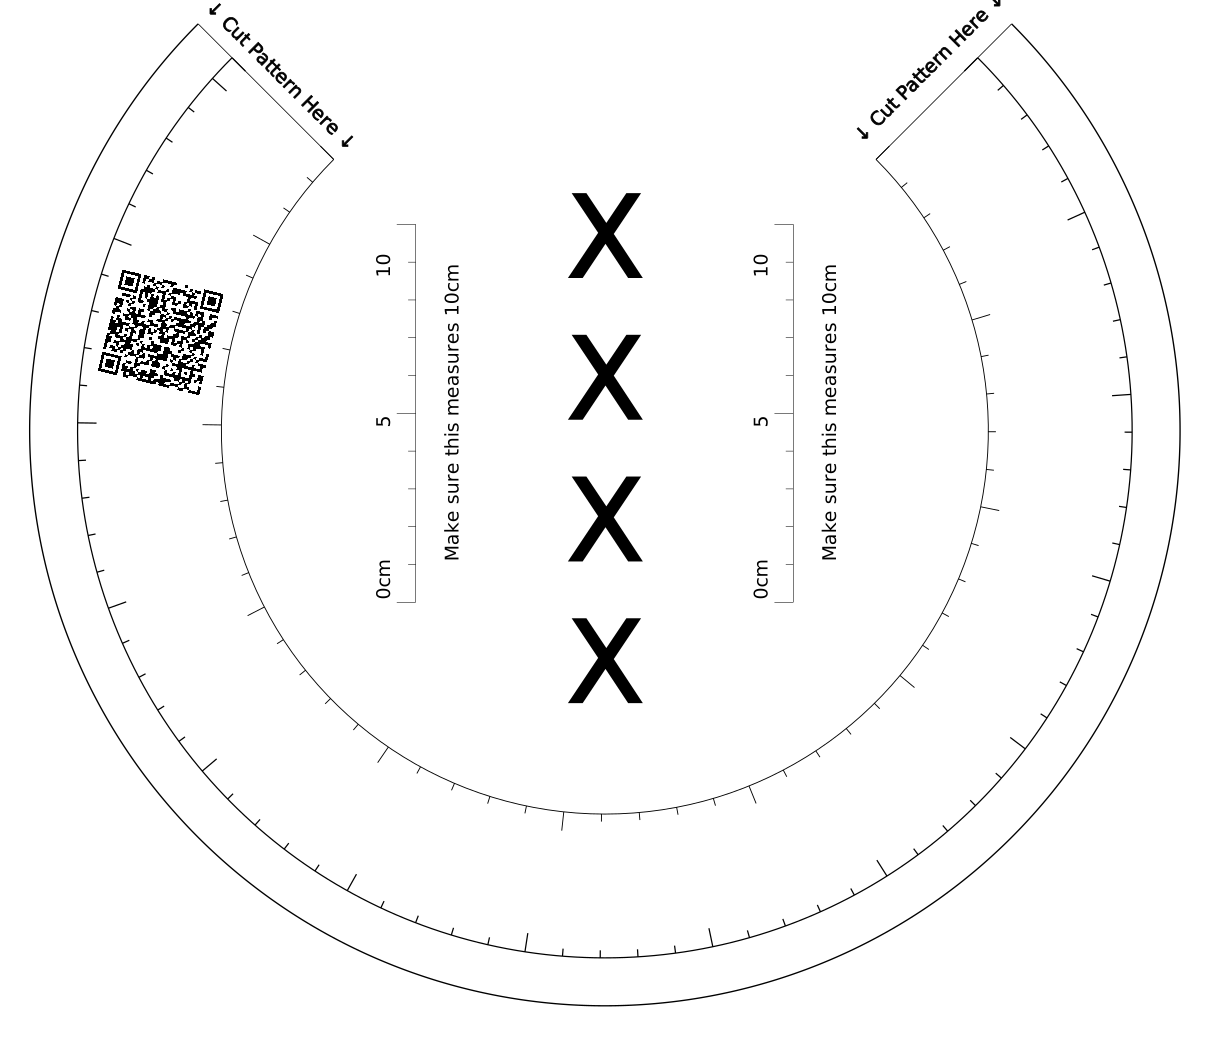
While we have some tools to convert SVG to FreeSewing code, in this case it would make much more sense to draw the circle segments using code.
We have this function: Path.circleSegment() | FreeSewing
And this macro: ringSector | FreeSewing
Both seem like they’d do the job easily. I can help with coding if you want. But you’d need to explain how the collar is drafted and then sewn to the body, because the instructions on your pattern aren’t super clear (is seam allowance included etc.?)
It probably would make sense to add the collar to the part library so it can be easily used from multiple designs (Toni, Teagan).
Sure, that sounds great. Let me give it a first draft here:
The drafting without seam allowance:
The collar should be an arc where the inside seam is 8.5" diameter. The width of the collar (from inner arc seam to outer arc seam) should be between 0.75-1.5" depending on user preference (1.25" is a good default). The length of the outer seam should be 80-95% of the neck opening seam (88% is a good default). The 8.5" inside diameter of the collar works well for a wide range of sizes and neck openings. If the neck opening is especially large, the diameter can increase.
The collar construction:
- Cut out two collar pieces and place them right sides (faces) together.
- Stitch along the inside of the curve to attach the inside of the collar to the outside of the collar.
- Open out the ends and place them right sides (faces) together. Stitch together the ends to form a loop.
- Press the collar right sides (faces) out, preferably using a ham.
Attach the collar to the neckline in two steps: marking the quarter points, and attaching.
Marking the quarter points:
- Mark the collar into quarters. This will be used to distribute the ease since the collar is slightly smaller than the neck opening. Make sure the quarter points do not coincide with the seam on the collar.
- Mark the center front and center back of the neck opening. These are the half circumference points of the neck opening.
- Place the center front and center back together at the raw edge. Working to the left, align the top edges of the front and back neck lines until they meet (somewhere near the shoulder seam, but not usually at the shoulder seam). Mark this point as the left quarter point.
- Repeat the previous step to mark the right quarter point. We now have four quarter points on the neck opening, center back, right, center front, left.
Attaching the collar to the neck opening
- Place the t-shirt body right side (face) out. Place the collar around the outside of the t-shirt body aligning the raw edges of the collar with the raw edges of the neck opening. Orient the collar so that the seam on the collar is between the center back and shoulder seam.
- Align and pin or clip the collar to the neck opening at the quarter points of each. The collar should be slightly smaller than the neck opening between each quarter point. There should be 3 layers of fabric you are clipping/pinning together: neck opening, inside of collar, outside of collar.
- Pin or clip the collar to the neck opening evenly distributing the ease between each quarter point. Make sure three raw edges are aligned as you pin or clip.
- Serge or stitch the collar to the neck opening.
- Check for any unintentional puckers (small folds) in the collar. Seam rip and correct the puckers.
- Optionally top stitch the neck opening around the collar using stretchable stitch to secure the seam allowance away from the collar and toward the body. This can be done with a straight stitch using thread like Eloflex, or a zig-zag stitch, a chain stitch or cover stitch.
Tips:
- While the collar should always be slightly smaller than the neck opening, the amount smaller depends on the stretch of the knit material. More elastic collar fabric can have a smaller collar and less elastic fabric needs to be closer to the size of the neck opening.
- It’s a good idea to make sure the collar fits comfortably over your head before attaching it to the neck opening. If the collar is too small, either enlarge the collar, neck opening or both before attaching the collar.
- To enlarge the neck opening, simply trim a small amount (like 1cm or less) from the neck opening.
- To enlarge the collar you’ll need to cut a new one. Extend the arc a little further maintaining the curve. It’s not too critical that the curve be exact, just that it does curve about the same.
I know we’ll likely need some diagrams or photos to go along with these instructions, but let me know if this sounds like we’re on the right track for including the collar. Thanks for offering to help out with the coding part.
1 Like
Sounds good. Note that FreeSewing patterns pretty much never use absolute values like the 8.5" or the 0.75-1.5". We should probably express them as an (adjustable) factor of either a body measurement or of the neck size that evaluates to about that number for an average adult. So that the pattern works on all sizes from a small doll to a child to a large human.
Do we need to add seam allowances on all edges? Or are they included in your numbers? FreeSewing patterns draft without seam allowances and then let the user add a custom one if they want.
Yep, I’m with you on making it scale appropriately. That’s why I love this group  and these patterns. Making these ratios of the neck opening should work great. I know the diameter and collar width work well with a neck opening at the seam of about 65cm, so that would be great to start. While the diameter of the arc should increase or decrease with the size of the neck opening, the width of the collar should not be a ratio since larger neck openings don’t typically mean wider collars (similar to the way bias binding isn’t necessarily wider with larger sizes).
As for the seams, they would go on all sides of the arc: inside, outside and start/end. My original description of sizes did not assume seam allowances.
Let me know if any other info is needed. Really looking forward to collaborating on making some better t-shirt collars.
1 Like
Now that I got my development environment working, I’m giving this a go myself. I’ve already successfully gotten some collar part to render. I’ll drop a line if I need some help.
3 Likes