Simon: fronts + back (+ outer yoke) as one piece of fabric?

Hi!

This is my first post here, I am new to this amazing site. The past few days, I’ve been busy tweaking Simon to my measurements, and I think I got it now.

I was thinking: my pattern has a straight seam to connect front and back on the sides, and the front and back are narrower at the shoulders than at the waist, because my belly is dominant. And so the chest and waist and hip sizes are all the same. Now I was thinking: why do I cut three pieces and then sew the together when I can cut one large piece instead, consisting of left + back + right? If the yoke seam is straight, I could even add the outer yoke piece to the back. Right?

The paper template fits exactly. But why is this not a great idea?

From what I can gather, it will make adding the sleeves more tricky, because I’d probably have to close them first and then attach them with a round seam, because I would not be able to first attach the sleeves and then close the sleeves and front-back. OK, that’s more difficult for sure, but I’ve seen this procedure in instructions for shirts on youtube tutorials also, and it seems doable, too. They didn’t use a flat-felled seam, though. But still.

Also, I think that there are yokes out in the wild that have no cross back seam, i.e., the back and outer yoke are indeed one piece, and the inner piece is separate and then is also just open, making it an upside down pocket inside the shirt. So I see no reason not to directly attach the yoke. Even with a round back, I could just have a plaid/dart, like also for the sleeves at the wrists or the darts on the back.

Another problem might be that the fabric is not wide enough for the whole piece. So then I would have to rotate the fabric by 90°, which would violate the grain line, I suppose. But is this really a big problem for very simple woven cotton fabric?

Hmm. Like always, I am starting to experiment even before finishing my first time I do something new… I cannot ever following instructions, it seems. So please stop me! Give me a good reason, make me understand my confusion. Tell me why this will end in an catastrophe.

Thank you!

Best regards,
Henrik
1 Like

Historically, a yoke was the basic component of a shirt. Whether or not to use one on your shirt is up to you, you are the maker :slight_smile:. They can serve several different functions.
A double yoke, for example, reinforces the top of the shirt, the part that gets the most use.
It can easily be adjusted to fit the shape of your back and shoulders.
They can also incorporate darts.
They can also incorporate pleats or gathers in the lower back.
They can also be a purely design-oriented feature.
There is a wonderful book by David Page Coffin called Shirtmaking that explains many things about shirts and of course also the use of a yoke.

2 Likes

I think one of the main reasons shirts are typically drafted and made with 3 panels and side seams is the seams allow for easy adjustment to alter the fit of the shirt, so it isn’t just a billowing tent on the wearer.
If you don’t want or need that shaping there, I don’t see why you can’t do it as a single piece instead of three pieces.

Thank you! So you think rotating by 90° is also no issue? Otherwise the three pieces won’t fit the fabric.

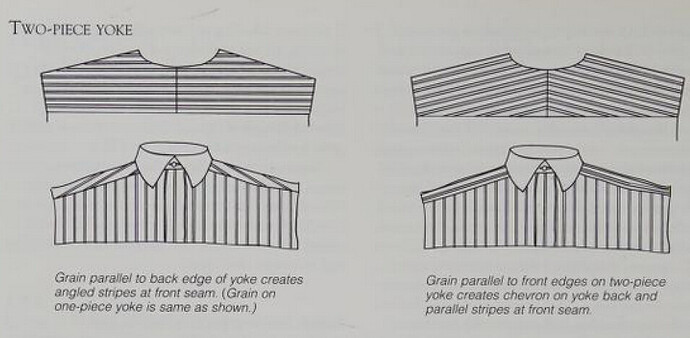
Rotating the yoke piece or rotating everything? Yoke enables exactly that. Take into account that often fabric have different stretch in weft and warp direction.


This is from above mentioned D. Coffin book which you can also go through in the interent arhive’s open library

2 Likes

If I want to cut front left + back + front right in one piece, I need to rotate the fabric, because it is not wide enough, so then the grainline marked on the templates will match the weft. Is that any problem with std. cotton cloth? Stretchiness feels very similar in weft and warp directions, and quite small, actually..

If there is no discernible difference in stretch, you should be ok with rotating 90 degrees

most side seams won’t be straight enough to do that, but if they are, you could indeed cut the pattern that way assuming the shoulder parts don’t overlap.
Cutting a pattern piece rotated 90 degrees from grain is called cross grain and while it will be slightly weaker that direction (because of the difference in warp and weft threads) it is usually just fine. As for adding the yoke to the back, again, you can however usually there’s a box pleat in the center back (or at least I always use one) to allow better range of movement. The last problem with cutting the back and front sides as one piece would be if you need bust darts, but since this is for Simon, not Simone, I’m going to assume that’s not an issue.
TLDR:
rotated 90 is “Cross Grain” and should be fine
left+back+front may be fine if your side seam is straight and you don’t mind having no shaping.
and ability to add yoke to center back depends on personal preferences like whether or not you want a center back box pleat.

3 Likes

Thank you very much for encouraging me to try this, and for the explanations why it is probably OK. I’ll report back once it’s done.

1 Like

I agree. Since this is your first time making this garment, I highly suggest you just follow the pattern as it. You will better understand the pattern and can always redesign it for your third of fourth make. Plus learning how to put in a yoke is a valuable skill. But, at a theoretical level, a yoke is a dart. It is a fitting seam which will be very helpful when you make your muslin if you have an excess in the back. Just my view. Does not invalidate your approach. It’s your shirt and your fabric.
p.s. You did not mention, but it is also good practice to make a muslin the first time making a pattern before cutting into your good fabric. Flat patterning from body measurements is great. But just a start. Additional tweaks are often needed since the fabric hangs on the 3D body differently that it lays on the 2D table. Cheers!

1 Like

Yes, for the first shirt, I am sticking to the original instructions, exactly for the reasons you list. I also do not expect it to have a perfect fit, so I am making it from a cheap fabric. To learn, adjust measurements, and then do it better in the next shirt.

I did put a slight curve into the back at the yoke seam – one of my best fitting shirts has that, too, and it definitely makes it a better fit on the back. But for an experiment, later and just for the sake of experiments, I plan on making a huge single piece of fabric version as described.

Currently, I am stuck in Step 5 ‘Optional: Sew in your label’, because I had no label. Yet…